Tape it up, yes – but do it properly!

Climbing is arguably one of the most versatile full-body workouts there is. Whilst muscles become stronger relatively quickly, tendons, ligaments, cartilage and joint capsules take considerably longer to adapt to the stresses placed on them. Yet it is precisely these structures that are put under enormous strain when climbing – and, unfortunately, are also particularly prone to causing problems.
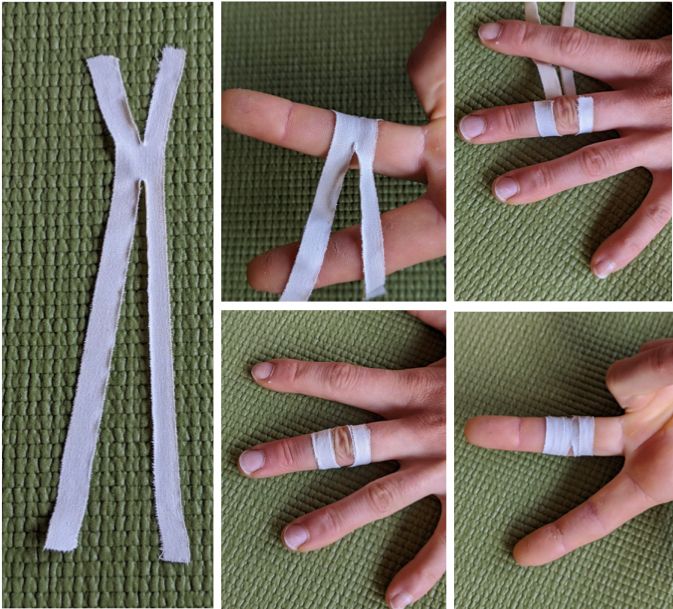
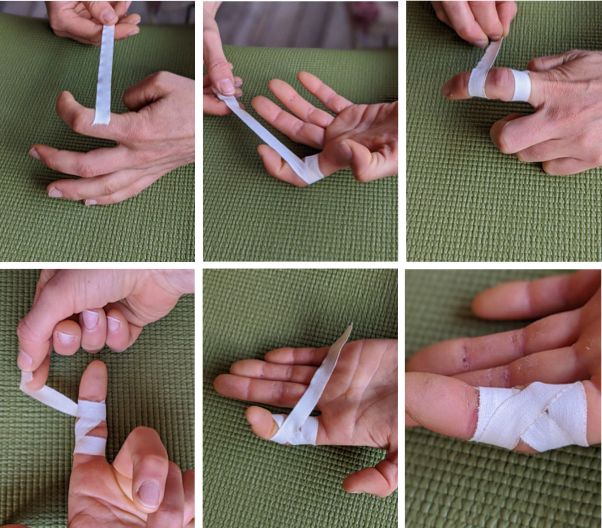
H-Tape am Finger
H-Tape am Finger

Tape helps, but not if it’s done wrong

Taping can help to take the strain off injured areas in the short term and provide support whilst climbing. However, taping correctly is a skill that needs to be learnt. If applied incorrectly, tape can actually do more harm than good.

When should you use tape when climbing?

First, the most important rule: tape is not a fashion accessory, nor is it a substitute for proper training or adequate recovery. Tape is used when discomfort or injuries are already present – not as a preventative measure.

Why? Quite simply: tape takes over some of the body’s stabilising work. If you use tape long-term without any symptoms, you’re relieving the joints and surrounding structures of their workload. The body gets used to the support and, in the long run, this can lead to weakness and imbalances.

Therefore:

  • Don’t apply tape out of habit.
  • When warming up, try to climb without tape if possible.
  • Only start using tape when the workload increases – and only if you can do so without pain.

If pain occurs despite wearing tape, stop climbing immediately.

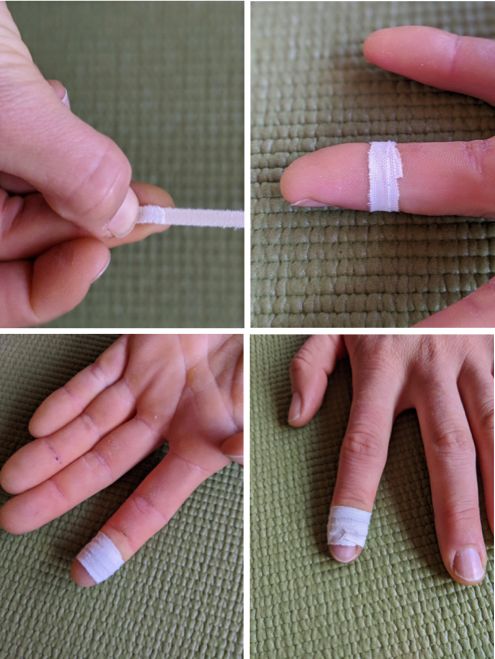
Taped fingers

Skin injuries: How to tape a flap correctly

A classic injury in climbing: the so-called ‘flapper’. This involves a layer of skin partially peeling away – usually on the fingertips or palms. Tape is used here primarily to protect the skin from further strain.

Here’s how it works:

  • Tear off about 15 cm of tape.
  • Choose a strip of tape slightly wider than the wound.
  • Fold the end over slightly so that the adhesive side doesn’t lie directly on the open area.
  • If possible, first carefully fold the skin back over the wound and then secure it with tape.

Important: Do not wrap it too tightly around the joint – the purpose of the ‘flapper’ is to protect the skin, not to provide stability.

Ligament injuries: The Classic H-tape

Ring ligament injuries are among the most common injuries in climbing. In particular, the crimp grip places enormous strain on the ring ligament complex. Typical symptoms include:

  • tenderness when pressure is applied to the finger,
  • swelling,
  • small bruises,
  • pain when pulling on the flexor tendon.

This is where the so-called H-tape comes into use. It helps the injured ring ligament to keep the tendon close to the bone.

Here’s how to prepare the H-tape:

  • Use a strip of tape approximately 12 cm long and 12 mm wide.
  • Make a cut in the centre of both sides, leaving a small bridge – the typical H-shape.
  • Place the bridge on the inside of the finger, above the joint.
  • Then secure the short strips first and wrap the long ends around the finger.

Important: Do not pull too tightly. The tape is intended to stabilise, but should neither restrict blood flow nor push the joint out of its neutral position.

This taping technique can also provide support in cases of irritated tendon sheaths.

H-Tape on the finger

Taping an irritated middle finger joint

Pain in the middle joint of the finger can have many causes:

  • irritation of the joint capsule,
  • tendon strains,
  • joint effusions,
  • overuse.

If the exact cause is unclear, taping can help to relieve some of the strain on the joint.

Note:

  • Keep the finger slightly bent (approx. 30 degrees) whilst applying the tape.
  • Apply the tape in a spiral pattern over the joint.
  • Ensure there is sufficient range of movement.

An alternative is ‘buddy taping’ – where the injured finger is secured to the neighbouring finger. However, this method is often rather impractical when climbing.

Taping a painful middle finger joint

Taping for tendon problems: wrist & elbow

Tendon problems often arise when climbing due to high loads in hanging finger positions or sudden peaks in load.

Typical symptoms:

  • Pain in the forearm,
  • a pulling sensation in the wrist,
  • irritated elbows.

Tape can be applied to the wrist or elbow area to provide support.

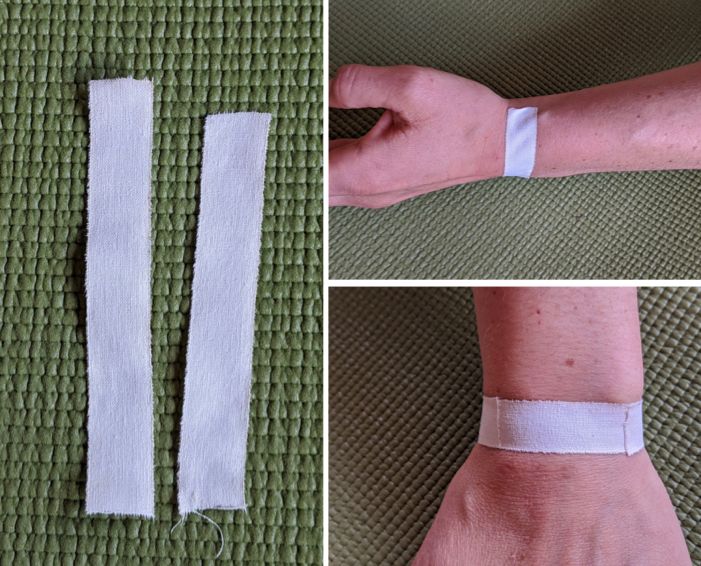
Tape on the wrist

Tape on the wrist

Here, two overlapping strips of tape are applied loosely around the wrist. It is important to ensure:

  • sufficient range of motion,
  • no restriction of blood circulation,
  • do not wrap it completely around the wrist.
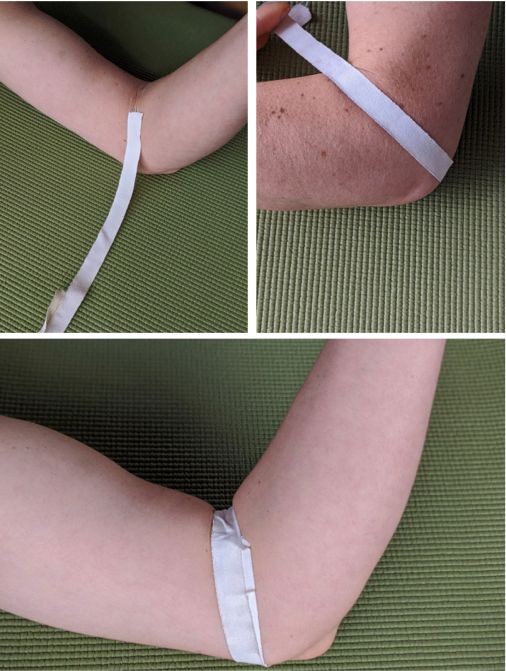
Taping the elbow

Tape on the elbow

On the elbow, the tape is applied loosely below the joint. It is particularly important here never to apply the tape too tightly, as the muscles tense up considerably whilst climbing and it is essential to ensure adequate blood circulation.


General tips on taping

  • Never apply tape too tightly.
  • Always tape joints in a neutral position.
  • It’s better to use narrow strips.
  • Loose tape is better than constricted fingers.
  • Tape is no substitute for rest or rehabilitation.

Which tape is best for climbing?

Many climbers still rely on Classic Leukotape from the chemist’s:

  • tear-resistant,
  • strong,
  • good adhesive properties,
  • low elasticity.

It is not so much the brand that matters as the correct application.

The best way to help: avoid injuries

The best tape is still the one you don’t need at all. So:

  • Warm up your fingers properly,
  • increase the intensity gradually,
  • do balance exercises,
  • take your body’s warning signs seriously.

Pain in the elbow or shoulder, in particular, is often an early sign of imbalances that can later lead to finger injuries.

And very importantly:
anyone who carries on climbing whilst in pain risks chronic problems and long periods of rehabilitation.

Look after your fingers – after all, they’re your most important tool on the rock.

You might also be interested in these articles